
Creating an ASP.NET C# Bot using the Microsoft Bot Framework
This article will help you create your own ASP.NET Bot using the Microsoft Bot Framework. The bot main logic will be written in C# and using Visual Studio 2015 (community edition).
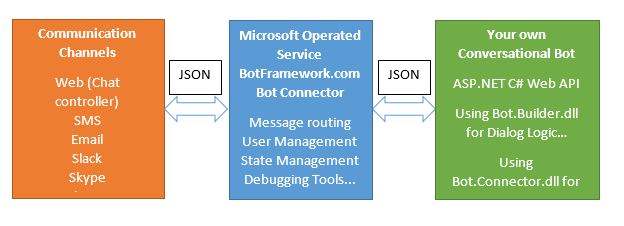
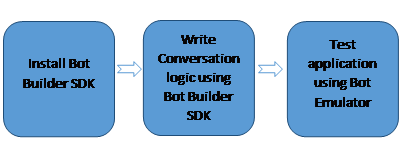
Building a bot using Microsoft Bot Framework requires three main parts:
1. Your own Conversational Bot, which is an ASP.NET web API application. You can implement your own conversation logic using the Microsoft “Bot builder SDK (Microsoft.Bot.Builder.dll) and you can handle the conversation messaging and security using the “Bot Connector libraries”.
2. Microsoft Operated Service, which is a Microsoft hosted azure service, also known as the Microsoft Bot Connector. It acts as an interface between your bot and various communication channels. This service will forward messages from the user to your Bot and from your bot to the user.
3. Communication channels: the communication channels that your user will use to communicate with your bot; such as the web using an embedded web chat controller, SMS, email, slack, skype, GroupMe, telegram, and other communication services. You can configure your bot communication channels in the Azure Bot Connector service.
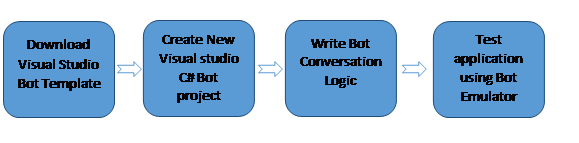
1. Download and install the visual studio 2015 Bot application template:
a. Download the template from: http://aka.ms/bf-bc-vstemplate
b. To install the template into Visual studio all you need to do is save the downloaded zip file into your Visual Studio 2015 project template directory. The directory is usually found under documents\visual studio 2015\templates\ProjectTemplates\Visual C#\
2. Create a new C# bot project:
a. Restart visual studio and create a new C# project of type “Bot Application Template”

b. Keep the default name: “Bot Application1”
c. The created project is an ASP.NET web API project that references the Bot connector libraries (Microsoft.Bot.Connector).
3. Write your own bot logic:
a. The created project main functionality is in the Controllers\MessageController.cs class and more specifically in the following Post function of an api/Messages call:
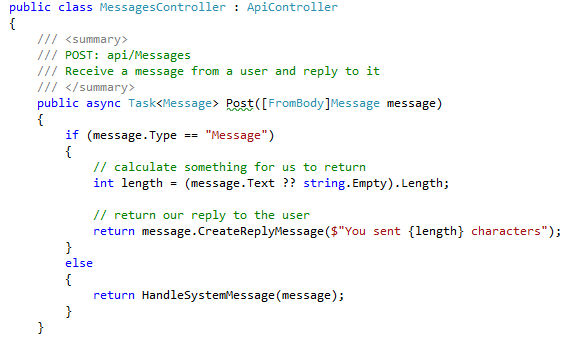
b. The MessageController defines an asynchronous method that accepts a Microsoft.Bot.Connector.Message object from the request body and returns a Microsoft.Bot.Connector.Message object.
i. The Message object Type field having the value “Message”, which refers to a simple communication between a user and the bot. Check the following link for the available message types: http://docs.botframework.com/connector/message-types/
ii. This sample code calculate the length of the user message and call message.CreateReplyMessage(Text,[language]) to send a reply text to the user. The createReplyMessage function takes a text string property in “MarkDown” syntax that will be returned to the user and an optional language property that takes a language code. A Text property allows the returned text to be rendered according to a set of markdowns, for example if you set the text to “Helo **Tom**” the rendered message will make Tom bold. Check the following link for the available Markdown elements: http://docs.botframework.com/connector/message-content/#the-text-property-is-markdown
c. The default sample function will just return a text message to the user that includes the length of the user message string.
4. To test your application you can use the Bot Framework Emulator. The emulator is a separate desktop application that has an embedded chat controller and that can connect directly to your bot web API service (without the need for the Bot Connector service). You can use it to test your created bot API interaction.
a. Build and run your created Bot service in visual studio, that will start IIS express and the load browser with the default url (http://localhost:3978/api/messages).
b. Download the Bot Framework Emulator application from the following link: https://aka.ms/bf-bc-emulator
c. Install the emulator application, and run it (keep the default setting for now):
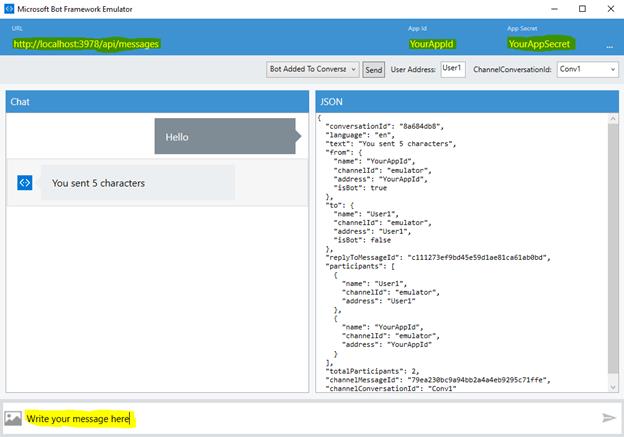
d. Write your own message in the emulator (Text box in the bottom of the application)
e. The emulator will send a JSON API request to your Bot API, return the Bot reply and display it in the Chat Window.
f. The emulator will display the received JSON reply in the left window
g. The emulator needs the Bot URL, the Bot app id, and the Bot Secret to communicate with your Bot API. The default bot API URL is set in the emulator as http://localhost:3978/api/messages (make sure the application port match the emulator set port), the default app id as “YourAppId”, and the default App Secret as “YourAppSecret”. Your Bot app id and app secret are stored in your project web.config file and they are used to secure the communication with between the bot and the user.
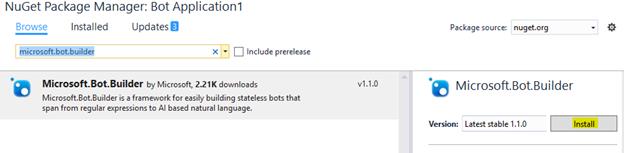
1. Install the Bot Builder SDK: To use Bot dialogs we need to install the Bot Builder SDK:
a. Right click on your newly created project and select “Manage Nuget Packages”.
b. In the “browse” tab write “Microsoft.Bot.Builder”, click install and accept changes.
2. Write conversational logic using Bot Builder SDK Dialog Object: The dialog model is a conversational process that encapsulates its own state in a C# class. We can use the Dialog object to write sophisticated bot logic:
a. First, add the following namespace to the Controllers\MessageController.cs file:
Using Microsoft.Bot.Builder.Dialogs;
b. Next, change the MessageController Post method to call a class that implements IDialog. We will call that class HelpDialog:
public async Task<Message> Post([FromBody]Message message)
{
if
(message.Type == “Message”)
{
return await Conversation.SendAsync(message, () => new HelpDialog());
}
c. Now let us add the C# class HelpDialog in the file Controllers\MessageController.cs:
namespace Bot_Application1
{
[Serializable]
public class HelpDialog : Idialog<object>
{
public async Task StartAsync(IdialogContext context)
{
}
…
i.
HelpDialog
is marked with the attribute Serializable
so that the object instance of this class can participate in the runtime
serialization, which allows for all state of the dialog to be serialized per
user and per conversation and stored in IbotDataBag.
ii.
HelpDialog
implements an Idialog that can call child dialogs or send messages to a user.
Dialogs are suspended while waiting for message from the user and they are
resumed when they receive a message from a user.
iii.
StartAsync is a member function of the Idialog
interface, which takes the dialog context as parameter and return a
System.Threading.tasks.Task that represents an asynchronous operation.
StartAsync is the first function called when a dialog is started.
iv.
IdialogContext is an interface that provides the services needed to save state
and communicate. It includes the following functions:
1. Call: call a child dialog and add it to the top of the stack.
2. Done: complete the current dialog and return a result to the
parent dialog.
3. MakeMessage: Make a message.
4. PostAsync: Post a message to be sent to the user,
5. Wait: suspend current dialog until the user has sent a message
to the bot.
d. Next,
we will add an implementation for the context.Wait function in the HelpDialog StartAsync
method, which will suspend the dialog until the user has sent a message to the
bot and then call a method to resume the dialog when the message has been
received:
public async Task StartAsync(IdialogContext context)
{
context.Wait(YourFunctionForMessageReceived);
}
e. Next we need to add some code to YourFunctionForMessageReceived:
public async Task
YourFunctionForMessageReceived(IdialogContext context, Iawaitable<Message> argument)
{
var
message = await argument;
if
(message.Text == “help”)
{
PromptDialog.Confirm(
context,
YourFunctionForHelpCommand,
“Are you sure you want to
display help?”,
“Didn’t get that!”);
}
else
{
int length = (message.Text ?? string.Empty).Length;
await context.PostAsync($”You sent {length} characters”);
context.Wait(YourFunctionForMessageReceived);
}
}
i. This function takes the context as argument and the user message.
ii. We check the user received message if it is equal to “help” then we will display a yes/no prompt dialog to confirm his request.
iii. Microsoft.Bot.Builder.Dialogs.PromptDialog class contains several classes to prompt the user for confirmation. In this implementation we used the PromptDialog.Confirm class that takes as input the context, a function to be called when the user respond to the confirmation dialog, a prompt to show the user, and another to show the user when asking for a retry.
iv.
If the user typed anything other than “help”,
the bot will just display the length of the message (This is the same code that used to be in the MessageController Post
function)
f. Lastly, we add some code to YourFunctionForHelpCommand:
public async Task YourFunctionForHelpCommand(IdialogContext context, Iawaitable<bool> argument)
{
var
confirm = await argument;
if
(confirm)
{
await context.PostAsync(“I am a simple bot that will display the length of your messages! You
can display this message by typing \”help\”!”);
}
context.Wait(YourFunctionForMessageReceived);
}
i. This function is called when the user is prompted to confirm his help command. The function takes as argument the context and a Boolean argument.
ii. If the user confirmed his request, a message will be returned to the user using the context.PostAsync function to display some information.
iii. Context.Wait is called to suspend the dialog until the user sends a message to the bot. The resume function is specified as the first function (YourFunctionForMessageReceived) to be called when a message is received from the user.
3. A sample conversational run for this code using the Bot Framework Emulator:
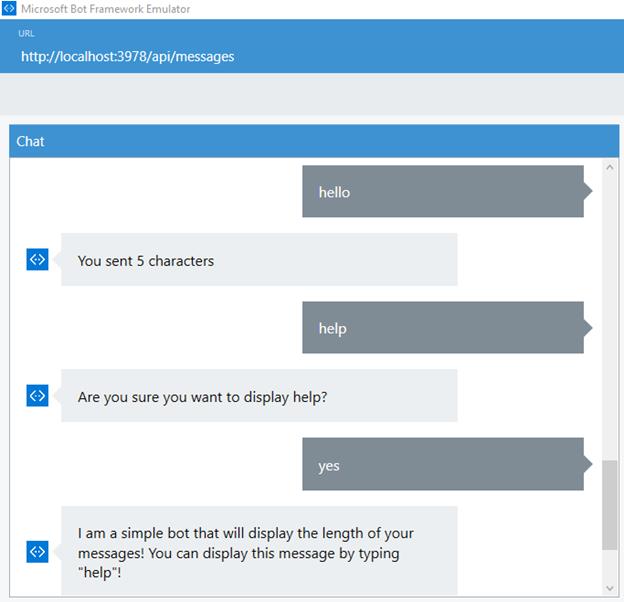
This sample code can be found on github at: https://github.com/Binarieslid/Bot-Application1/
Do you want to have your bot on the hololens? check this link:HoloLens Development